57 About the Low E key and Playing Low Notes
The Low E key
The low E key is located on the back of the boot joint and is nicknamed the “pancake key” because it is usually round and flat like a tiny pancake.
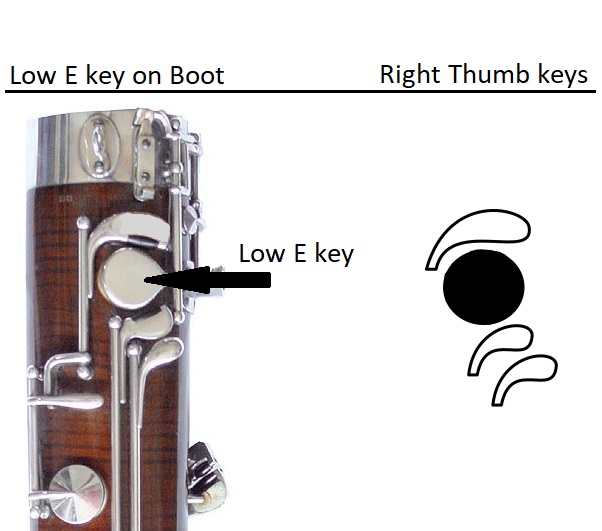
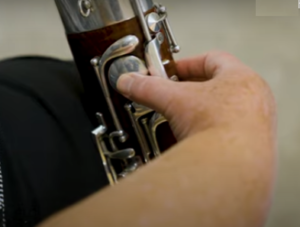
The low E key is operated by the right thumb, and it has two functions.
- It closes the low E tone hole on the boot joint.
- It operates the whisper key for the lowest notes when the left thumb is not available to press the whisper key.
The E tone hole has to be covered for low E and all of the notes below E.

The low E operates the whisper key via a bridge key mechanism between the boot and wing joints. The bridge mechanism will only work if it is properly aligned.
Note: The importance of this alignment is the reason for putting the wing joint into the boot joint first when assembling the bassoon.
Check the alignment of this bridge mechanism each time you put the bassoon together.
INSTRUMENT CHECK:
Once the bassoon is fully assembled, press the low E key. Now look at the whisper-key pad. It should fully cover the vent hole on the bocal nub. If it doesn’t quite touch bocal vent, adjust the alignment of the wing joint in the boot. Notice there is a “finger” which extends down from the bottom of the wing onto the boot. This finger rests on top of the “foot” at the top of the boot joint.
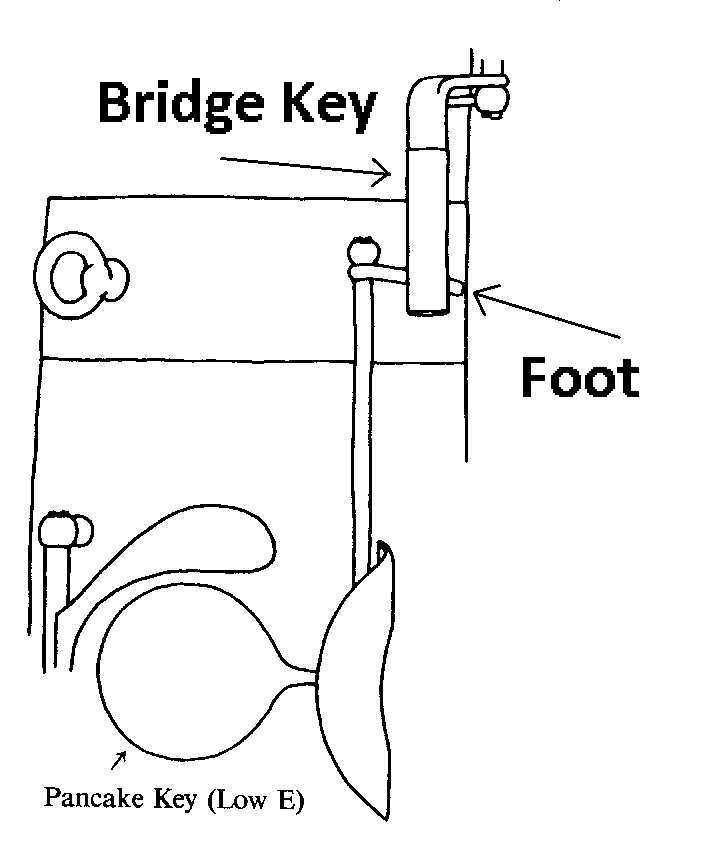
The foot has a “hill and a valley” and the finger must rest high enough on the hill of the foot to allow complete coverage of the bocal vent. Try turning the wing joint slightly counterclockwise and check alignment of the two scratches on the boot and wing. If this adjustment does not position the pad to create a solid seal against the bocal, you will need to have the key adjusted by a bassoon repairman.
Caution: Notes below low E will not work if the low E key does not fully cover the bocal vent.
If your bassoon passes the instrument check described above, the left thumb will not need to press the whisper key for low E down to low Bb because the low E key will be doing the job of the whisper key.
Relax everything to play the notes below the staff.
- SOFT lips
- OPEN jaws
- WARM air
- LIGHT touch
- SLOW air
- COVER all holes completely.
- “Hot pizza mouth”
Soak your reed!
- A dry reed will not play low notes easily. Make sure your reed is well soaked.
- The tip opening should be at least the thickness of a nickel. If the tip opening is too small/closed, the vibrations will be too fast to play low notes.
Note: If soaking the reed does not cause the tip to open, here are instructions for opening the tip using your fingers.
- Make sure the reed is well soaked! This process will crack a dry reed.
- Place the index finger and thumb of your weaker hand on the sides of the wire closest to the blades.
- Watch the tip opening as you use the index finger and thumb of your dominant hand like a pair of pliers. Squeeze the index finger and thumb holding the reed, making sure to keep your fingers ON the wire and squeeze on the sides of the reed wire.
- Keep your left-hand soft and slightly curved when moving the thumb between keys.
- Different passages of music will require that you use your thumb differently.
- Sometimes you’ll need to use the upper edge of your thumb, sometimes you’ll need to use the padded end of your thumb.
- Sometimes you’ll need to slide from one key to another; other times it will be better to use a different part of your thumb.
- Be flexible and creative in planning how best to use your thumb to achieve clean and fluid technique.
Watch this short video for a demonstration of the thumb motion for notes below the staff.
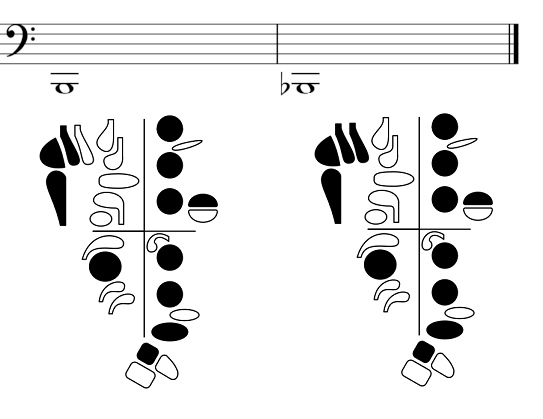
Play each of these notes using the fingering provided.

Troubleshooting Low Notes:
- Soak the reed for 2-3 minutes to open the tip. If that doesn’t open the tip enough use the technique from the video above to open your reed.
- Make sure the low E is pressing the whisper-key pad tightly against the vent hole in the bocal nub.
- Use only enough embouchure to keep the air from leaking out around the reed. Too much embouchure will make the note jump up the octave or sound somewhere between the low and middle octave.
- “Hot pizza mouth” is really helpful for the low notes. Relax your lower jaw to create a lot of space between your teeth and in your oral cavity. A closed space will make the low notes sharp.
- Blow a warm air stream. This will keep your throat and oral cavity open.
- Use a slow but steady air speed. If the air stream is too fast or too hard, the notes will come out in the wrong octave.
- Try not to squeeze with your fingers. You need to press the keys enough to close them but not more. Squeezing comes from tension and that will make it hard to move your fingers.
- All of the tone holes (E, D, C, B, A) must be completely covered. If you leak, you squeak. Use the pads of your fingers to cover the holes.

Feedback/Errata