89 Simple Reed Adjustments
Rules for Adjusting Reeds
- Maintain good posture, breath support, and an active ear when testing and playing the reed.
- PLAY the reed after EVERY adjustment. Sometimes only a little is needed. If you make several adjustments without testing after each one, you will not know which adjustment(s) helped.
- Address response, then pitch, then tone. 
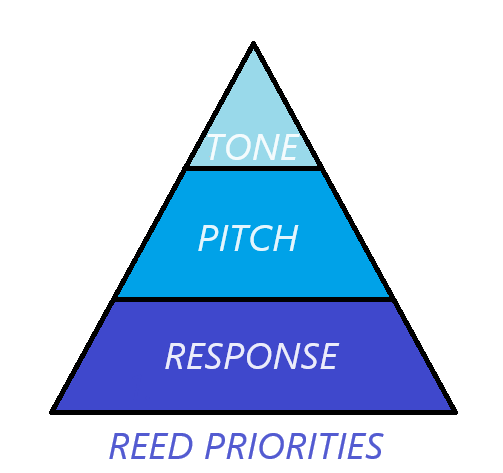 Fix the response first because if you can’t produce the note when it is needed, the tone doesn’t matter. Fix the pitch (intonation) next because if you can’t play the note in tune, the tone doesn’t matter. Play the reed for a few days before making adjustments for tone quality. If response and tuning are good, the tone will probably be acceptable.
 - ALWAYS insert a mandrel into the tube of the reed before making any wire adjustments. Wire adjustments can usually be undone if they don’t provide desired results. Once you scrape or trim the reed you can’t put that cane back on. Try adjusting the wires before scraping or trimming a reed.
- ALWAYS insert a plaque between the reed blades before scraping or sanding them.
- Reaming should be done on a DRY reed.
- All other adjustments should be done on a WET reed.
- When adjusting the reed blades, maintain a gradual and even taper from center to sides and from collar to tip
Adjustments for Response
Problem #1: The reed will not vibrate easily or evenly.
Tool: Container of room temperature water.
Solution: Soak the reed in a container of water, not in your mouth.
Problem #2: The reed feels hard to blow and has poor response, intonation, and/or tone.
Tools: Reamer (multi-fluted spiral or diamond type), Round file
Solution: Make sure the inside of the reed’s tube is free from splinters. Splinters can be removed using a reamer and/or a round file.
Problem #3: Your lips have to squeeze the reed very hard to make a sound and the reed makes your mouth muscles tired quickly.
Tools: Linesman’s pliers and mandrel.
Solution: Insert the mandrel as far as it will go into the tube. Hold the mandrel so the tip of the reed is in a horizontally straight position. Place the pliers directly on the top and bottom of the first wire and give a gentle squeeze to close the tip a little. This will reduce the resistance of the reed and help it respond more easily.
Problem #4: The reed often falls off of the bocal. It may also have poor response, intonation, and/or tone.
Tool: Reamer (multi-fluted spiral or diamond type) and round file
Solution: Make sure the reed fits securely on the bocal. The bocal should go between 7-9mm into the reed tube. If the reed does not go far enough on the bocal, use a reamer to gradually increase the space inside the tube of the reed.
Adjustments for Intonation (and Tone Quality)
Problem #5: The reed is FLAT and feels too SOFT you need to add resistance.
Tools: Pliers and bassoon mandrel for options 1 and 2, tip clipper for option 3
Solutions:
- Open the tip of the reed by gently squeezing the sides of the first wire.
- Open the tip of the reed by gently squeezing the top and bottom of the second wire.
- Clip tip back 1/2mm at a time until Center of Crow rises to E or Eb.
Problem #6: The reed is FLAT and sounds too BRIGHT.
Tools: Pliers and mandrel
Solutions:
- Open the tip of the reed by gently squeezing the sides of the first wire.
- Close the tip by gently squeezing the top and bottom of the second wire.
- If the reed is extremely bright, buzzy, and flat do Step B followed by Step A.
- To make the reed darker and more robust, and raise the pitch, squeeze the top and bottom of the second wire, then squeeze the sides of the first wire.
Problem #7: The reed is SHARP and feels too HARD you need to decrease resistance.
Tools: Pliers and bassoon mandrel for options 1 and 2, flat file for option 3.
Solutions:
- Close the tip of the reed by gently squeezing on the top and bottom of the first wire.
- Close the tip of the reed by gently squeezing the sides of the second wire.
- File or scrape lightly across back ½ of reed until the Center of Crow falls to E or Eb.
Problem #8: The reed is SHARP and sounds STUFFY.
Tools: Pliers and mandrel
Solutions:
- Close the tip of the reed by gently squeezing the top wire from the top and bottom.
- Open the tip of the reed by gently squeezing the middle wire from the top and bottom.
- Close the tip a lot by doing Step B and then Step A.
Adjustments for Feel & Tone Quality
Problem #9: The reed feels/sounds too STUFFY
Tools: Reamer, round file, wax, butane lighter or alcohol lamp, mandrel, pliers.
Solutions:
- Check tube – ream if fuzzy inside.
- “Pop” test: Wet the end of your finger and place it securely over the tube opening. Put the reed in your mouth and such the air out. Pull the reed out of your mouth while keeping the tube securely covered. If the blades stay closed and then “pop” open there is no leak. If there is no “pop”, the tube probably has a leak. Heat the wax and coat the mandrel tip. Insert the mandrel into the tube and turn to coat the inside of the tube. Repeat the entire process until the leak is sealed.
- Insert the mandrel into the tube and adjust the wires by squeezing the top and bottom of the first wire and then squeezing the sides of the second wire.
- Insert the mandrel and use pliers to loosen first wire slightly.
Problem #10: The reed sounds too BRIGHT.
Tools: Pliers and mandrel for options 1, 2, and 3; Fine grit (400 or 600), tip clipper for option 4.
Solutions:
- Insert mandrel and use pliers to tighten the first and second wires.
- Insert mandrel and open the tip of the reed by gently squeezing the sides of the first wire.
- Insert mandrel and open the tip of the reed by gently squeezing the top and bottom of the second wire.
- Insert sandpaper between the blades and pinch the tip of the reed closed while removing the sandpaper to sand the inside of the blade. Flip the sandpaper over and repeat to sand the inside of the other blade.
- Clip back tip 1/2mm at a time. Note: This will raise the pitch of the reed.
Problem #11 Reed tip won’t stay open and/or the reed is very flat.
Tools: Mandrel, pliers, reed wire, wire clippers
Solutions:
Check both the first and second wires for ‘snugness.’ Tighten each wire if loose. Don’t be surprised if the wire breaks while you are tightening it. Wires break pretty often.
Problem #12 Low notes are hard to start, it’s hard to start a note at a soft dynamic, and light/soft articulation doesn’t work.
Tools: Mandrel, plaque, wet/dry sandpaper, reed knife
Solutions:
- Thin the tip using sandpaper. (See video at top of page, beginning at 02:25 for demonstration).
- Thin the tip using a reed knife. (See video below).

Feedback/Errata