This chapter includes labeled images of each of the four joints of the bassoon. Areas needing special attention during assembly and disassembly are pointed out on each joint.
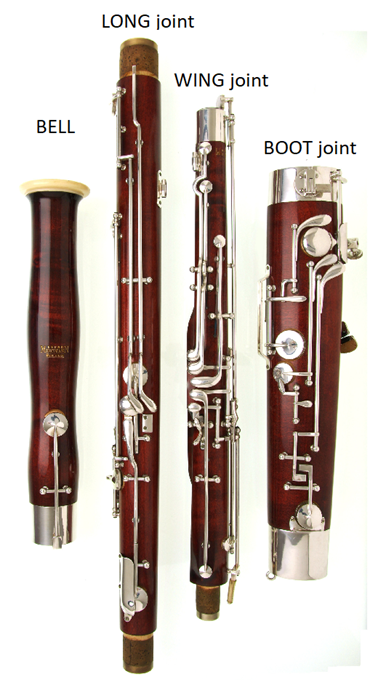
THE BOOT JOINT
The right hand operates the holes and keys on the boot joint.
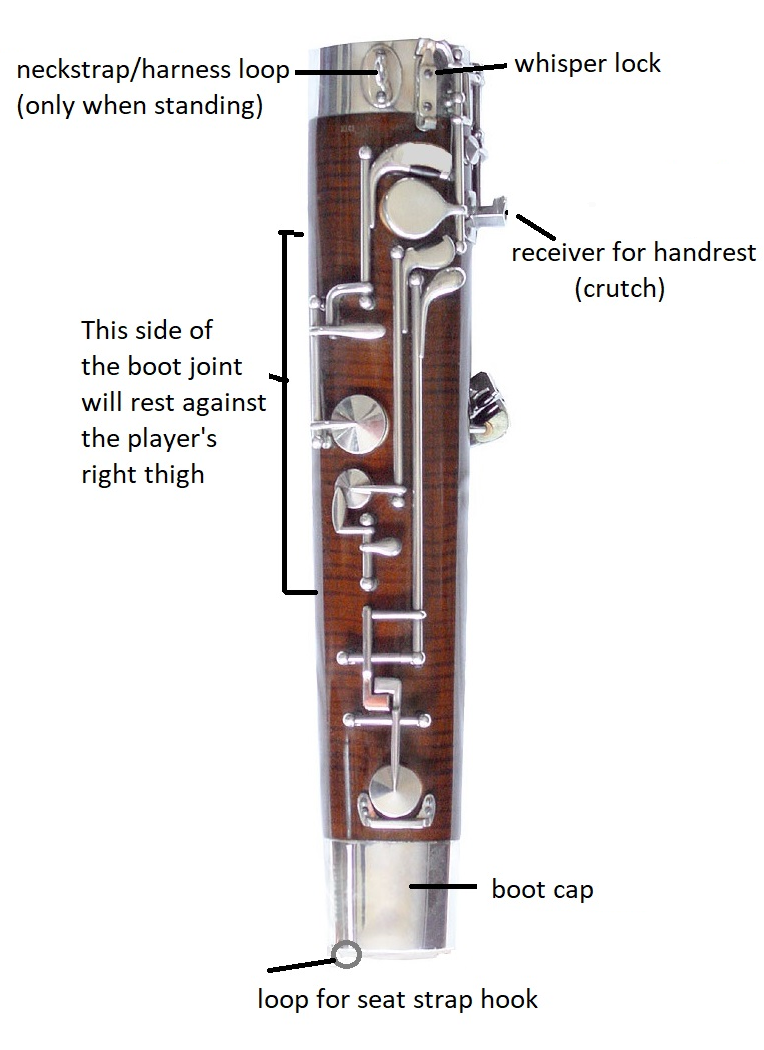
Back View (Boot Joint)
There are four keys on the back of the boot joint (the side that faces you). These keys are operated by the right-hand thumb.
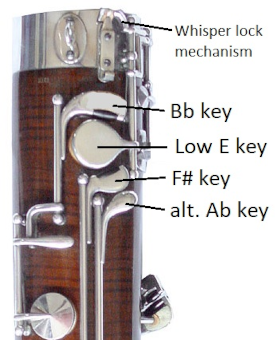
Things to know:
- The low E key is primarily used when playing notes below the staff.
- This b-flat key is used for all b-flats in and above the bass staff.
- This f-sharp key is part of the standard fingering for low and middle f-sharp.
- This a-flat key is a minimally used alternate option for playing low and middle a-flat. Some bassoons do not have this key.
Front View (Boot Joint)

Things to know:
- There are two open tone holes and five keys on the front (the side that faces away from the player).
- The B tone hole is covered by the index finger.
- The A tone hole is covered by the middle finger.
- The G key is operated by the ring finger.
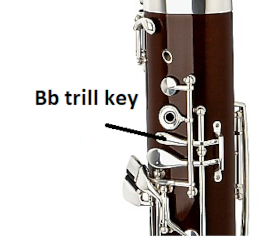
- The cluster of three keys at the bottom are operated by the pinky.
NOTE: On some bassoons there is an additional key between the A tone hole and the G key. It is a b-flat trill key, but in my 40-year career I have never used it. BEWARE the tendency to use this key as a standard fingering for b-flat. Good bassoon technique depends on developing agile and accurate use of both thumbs.
The WING JOINT
The wing joint needs to be handled with careful attention paid to the whisper-key pad (at the top), the whisper/low E bridge key at the bottom, the long, unsupported rods along the sides, and the tenon at the bottom end of the joint. These parts are especially prone to damage from careless handling when putting the instrument together and taking it apart.
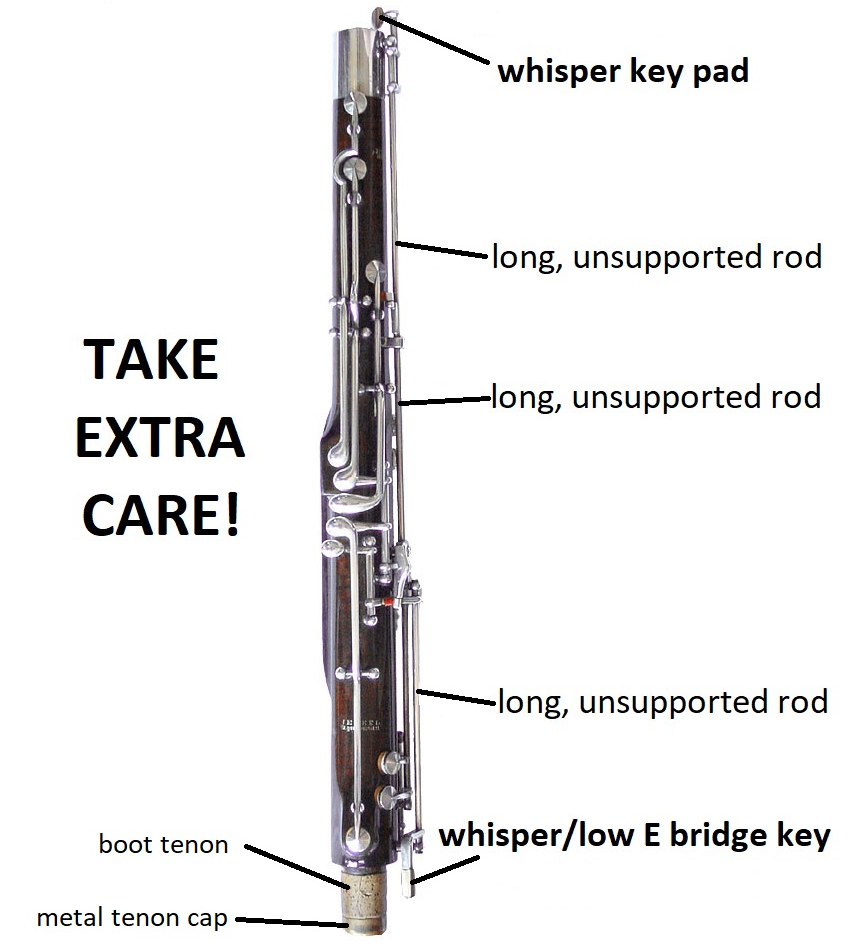
TAKE CARE:
- Avoid putting pressure on the rods.
- The metal rod extending beneath the wing joint’s body is a component of the whisper/low E bridge key. Due to its position, it is susceptible to bending. If this key is bent, the lower notes may not play correctly. Ensure that the bridge key avoids contact with other keys, rods, or posts on the top of the boot joint during the wing’s insertion into the boot.
- The whisper-key pad is designed to cover the bocal vent located on the nub near the bocal’s base when the whisper key is engaged. It is important to avoid contact between the bocal’s nub and the whisper-key pad while inserting the bocal into the wing joint. The replacement of this pad is a frequent necessity in bassoon maintenance.
- The wing tenon, a component of the wing joint, is designed to fit into the upper section of the boot joint. Due to its thin walls, the tenon is quite delicate. To insert the wing joint properly, ensure the tenon aligns directly with the opening at the top of the boot joint. While a metal tenon cap offers additional protection, careful handling is still necessary.
Back View (Wing Joint)
The left thumb operates the keys on the back of the wing joint.
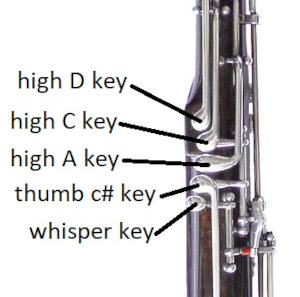
Things to know:
- The whisper key is used when playing notes on and below the bass staff.
- The thumb c-sharp key is used when playing c-sharp in or just above the bass staff.
- The high A key is used for the A-natural at the top line of the bass staff as well as some higher notes.
- The high C key is used for the C between the bass and treble staff as well as some higher notes.
- The high D key is used for the D just above the bass staff and some higher notes.
The left thumb does a good bit of hopping around from key to key. For this reason, it is especially important to support the weight of the bassoon with the seat strap. The boot joint of the bassoon should also rest securely against the right thigh. The base of the left index finger should rest against the long joint to act as a point of balance for the upper part of the bassoon. There should be little, if any, weight on this balance point.
Front View (Wing Joint)
The fingers of the left hand operate the holes and keys on the front of the wing joint.
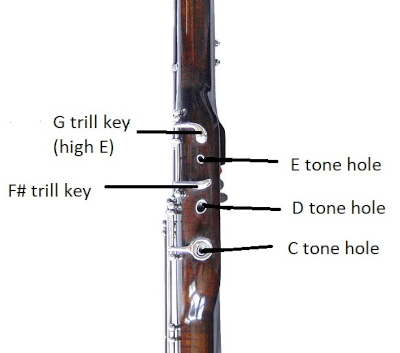
Things to know:
- The left index finger operates the G trill key (or high E key). Student model bassoons will not have this key.
- The left index finger covers the E tone hole.
- The left middle finger covers the D tone hole.
- The left ring finger covers the C tone hole. On “short reach” models this hole will have a key over the hole instead of an open tone hole. This decreases the stretch required between the left thumb and left ring finger and allows people with smaller hands to play the bassoon.
THE LONG JOINT
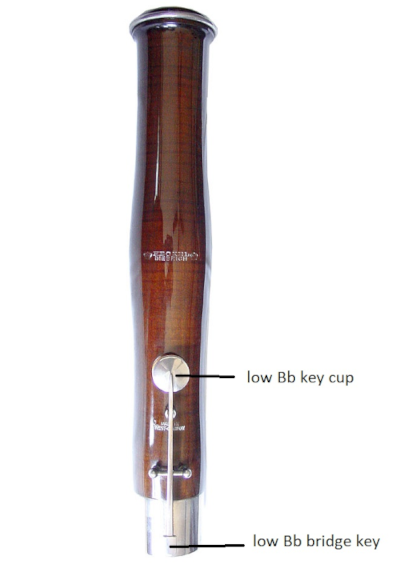
The long joint is easier to manage because there are fewer keys. However, care should still be taken during assembly and disassembly. The tenons at the top and bottom, the low Bb bridge key, and the body lock need special attention.
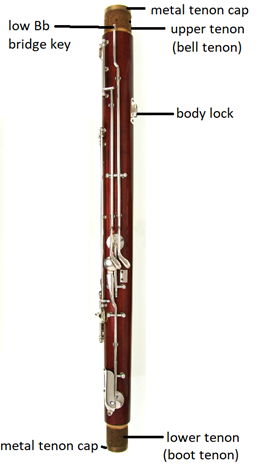
TAKE CARE:
- The long joint has two tenons, one at the top which goes into the bell, and one at the bottom which gets inserted into the top of the boot joint. The walls of the tenons are thinner than the body of the long joint and this makes them especially fragile. Be sure to keep the long joint parallel to the wing joint when inserting this tenon into the boot so that it goes straight in rather than from an angle.
- Bassoon tenons are covered in either cork or string. If the joints become difficult to put together or take apart the tenons will need lubrication. Apply a small amount of cork grease or Vaseline on cork tenons but not string tenons. String tenons need to be lubricated with a thin layer of wax because petroleum products will rot the string.
TIP: When lubricating the tenons, wipe off any old grease or wax before applying a new coat. If the grease or wax builds up on the tenon, it will bind the joint rather than lubricate it.
- The long joint pictured above has a protective metal cap on each of the tenons. This is extremely helpful. Unfortunately, these protective caps are not a standard feature on many bassoons.
- The low Bb bridge key extends a little above the body of the long joint. The other half of this bridge key is on the bell joint. Be sure to align the two halves carefully when sliding the bell joint onto the bell tenon so that the two halves don’t bang against each other.
- The body lock locks the long and wing joints together and prevents them from separating when playing in the low register. The screws that attach the lock hardware to the wall of the long joint can be easily stripped out because they are extremely small. When taking the bassoon apart, be sure to disengage the body lock between the long and wing joints before attempting to take the long joint out of the boot joint. Do not engage the body lock when putting the bassoon in its case unless the case offers enough blocking and padding to prevent the joints from shifting in the case during transit because shifting joints are likely to tear the screws out of the wood. If you do lock the joints together when they are in the case, be sure to disengage the lock before removing the wing or long joint from the case prior to assembling the bassoon.
Back View (Long joint)
The keys on the back of the long joint are operated by the left thumb.
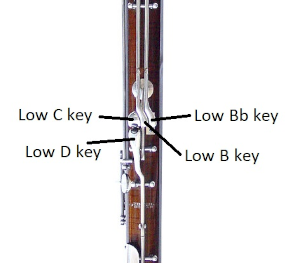
Things to know:
- The low D key is pressed to create D below the bass staff.
- The low D and C keys are pressed to create C below the bass staff.
- The low D, C, and B keys are pressed to create B below the bass staff.
- The low D, C, B, and Bb keys are pressed to create Bb below the bass staff.
Keys labeled “low” are used when playing notes below the bass staff.
- There are two b-flat keys (b-flat on the back of the boot joint, and low b-flat on the back of the long joint). They are not interchangeable.
- There are two c-sharp keys (thumb c-sharp on the back of the wing joint, and pinky c-sharp on the front of the long joint). They are not interchangeable.
- There is a D open tone hole on the front of the wing joint and a low D key on the back of the long joint. They are not interchangeable.
- There is an E open tone hole on the front of the wing joint and a low E key on the back of the boot joint. They are not interchangeable.
Front View (Long joint)
There are two keys on the front of the long joint, and they are both operated by the left pinky.
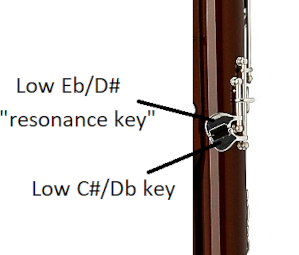
Things to know:
The upper pinky key serves two functions.
- It is pressed to create low E-flat/D-sharp below the bass staff.
- It is also used to improve tone (increase resonance) and intonation for specific notes that tend to be stuffy and/or sharp.
The lower pinky key is pressed to create low C-sharp/D-flat below the bass staff.
THE BELL
The bell of the bassoon extends the bore to create the lowest note on the instrument which is Bb below the bass staff. The sole key on the bell is operated by pressing the low Bb key on the long joint.
TAKE CARE:
The low Bb bridge key on the bell will overlap with the low Bb bridge key on the long joint when the bell is added to the long joint. Be sure to hold the low Bb key cup on the bell down to raise the bridge key and allow it to slide over the top of the bridge key on the long joint.

Feedback/Errata